
Google already provides you a tutorial
on how you can add a domain to your blogger blog. But it does not
specifically show the steps for setting up two domains - 1. Main Domain
2. Subdomain for your two blogger blogs i.e. you will have two blogs one
on main domain and the other on subdomain for example http://www.tualesoft.com and http://demo.TualeSoft.com/.
Below are 3 easy steps with images on how you can add a subdomain to your blogs existing domain without any difficulty.
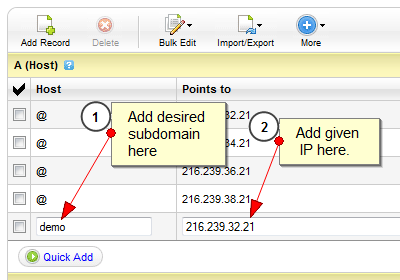
Step 1 : Add a A Name Record
Go to your domains registrar website and click on Change DNS/DNS Manager
option. There you would find different CNAME and A records you have
made previously for your main blog. Add another A name record with the
the desired subdomain as your host. For example if you want subdomain http://demo.TualeSoft.com/ for your blog then enter demo in the host name. In the IP/Point to section add this IP - 216.239.32.21 After adding save the record.
Step 2 : Setup the domain in Blogger
Now go to Blog Title → Settings → Basic → Blog Address → Add a Custom
Domain → Switch to Advance Settings and add your full subdomain in our
case it would be demo.TualeSoft.com Make sure the box saying "Redirect TualeSoft.com to demo.TualeSoft.com/" is unchecked else when someone goes to demo.TualeSoft.com/ (with no www ) they will be redirected to http://demo.TualeSoft.com/

Step 3 : Settings in the main Blog (Required in some cases)
Even after unchecking the box above, if the domain http://demo.TualeSoft.com (without www) redirects you to http://demo.TualeSoft.com Go to Main Blog Title → Settings → Basic → Blog Address → Edit and check the box which states "Redirect allbloggertricks.com to www.allbloggertricks.com" Thats it, the whole setup is done. Sometimes if takes 1-2 hours for making the changes by the domain registrar but most of the time change is withing 5 minutes. Your custom subdomain is ready.